Beach Finds and Barn Wood Shelf Craft How To Tutorial

Supplies:
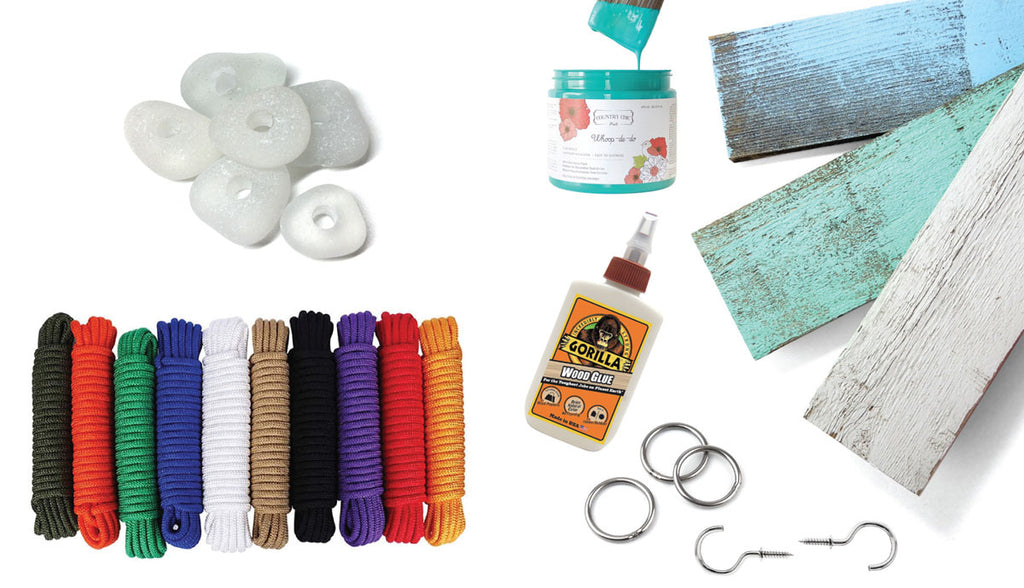
- 1 x 4-inch barn wood at least 3-feet long
- Chalk paint in a color of your choosing. Or you can leave it unpainted, depending on the beauty of the wood.
- Wood glue* and nails
- Miter saw, hand drill
- Or, if you aren’t “handy” with hand tools, you can purchase a pre-made floating shelf in blue or white.
- Two 1.5-inch open hooks
- Three 1– to 2-inch O-rings
- 4 feet of 3-millimeter paracord, more if your shelf is larger than 10 to 12 inches. I used white cord on this shelf because I am using white sea glass, but if I were using brown sea glass, I would use brown cord.
- 4-inch metal boat cleat
- 50 to 100 pieces of drilled sea glass with a 3.2 millimeter hole. I used all white sea glass as it is abundant, but I have also used all brown in the past and it looks great too. You could also use drilled beach stones, seashells, and/or beads.
- Lighter to finish the cord
Steps
I made a 10-inch square shelf by cutting the wood in equal lengths with my miter saw. I joined them to make a frame using framing corners and a framing gun, but you can use good old-fashioned glue and nails. Once you have made the shelf frame, you can paint it or leave it a natural color. If you are not familiar with using hand tools, consider purchasing a shelf in a design you like and adding the hanger, which is the most decorative part of this project.

Add the hanging hardware:
After the paint is dry on the shelf, pre-drill a hole in the top of the frame on each end for the open hooks and screw them in. The hole should be at least midway back or further back. How I judge it is by looking at the boat cleat and seeing how far it sticks out from the wall. The the screw hooks should be somewhere between that and the middle of the wood.
Secure the hanger to the O-ring:
We are going to tie a butterfly knot from the ring. The reason I use a butterfly knot is because it will not slip when force is applied from either end. Follow the instructions below or watch a video on YouTube to learn how to tie a butterfly knot.
Take one ring and insert the rope through and place it in the middle so the rope hangs down evenly on both sides.

1. While holding the ring with your right hand and the two strands of cord with the left hand, twist the rope twice. Stick your left thumb in the lower loop created by the twist and stick your fingers between the two strands of cord below the loop.
2. There is an “X” created above the loop where your thumb is. With your right hand, hold the ring with your middle finger to free up your thumb and pointer finger to grab the “X” and then let the ring dangle.

3. Grab the ring with your left hand.

4. Pull the ring through the bottom loop.
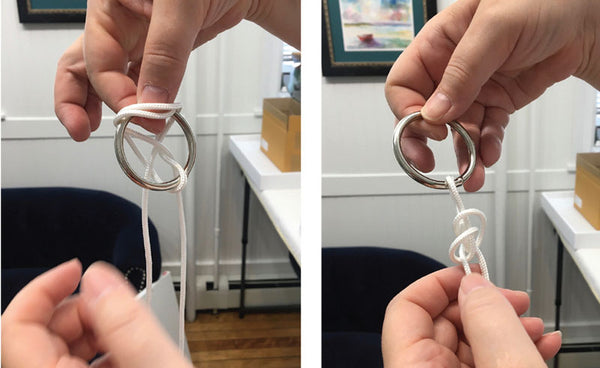
5. Pull the ring forward and up though the top loop held by your right finger and thumb.

6. Tighten the knot by pulling in all directions.
String sea glass on the cords:

Add sea glass to both strands of cord until you get your desired length.

Check the length of the cord next to the shelf.
Secure the strands to the O-rings:
Once the sea glass is at the length you want and it is the same length on each strand, it’s time to add rings to the bottom of each strand.

1. Loop the cord through the ring and bring the cord up over the ring, then behind the sea glass and back up through the ring on the other side.

2. Tie simple knots up the cord until there is no space between the ring and the sea glass.

3. Cut the cord and with a lighter melt the cord all the way around so it will not come undone. Repeat on the other side.
4. Screw the boat cleat into the wall. Attach the bottom rings to the open hooks and the top ring over the boat cleat.

Enjoy your charming shelf for all your goodies.
This article appeared in the Beachcombing Magazine September/October 2020 issue.
Make art with your beach finds

Learn how to make art, jewelry, and fun home decorations with seashells, sea glass, beach rocks, and more. Articles ›
Coastal and Beach Décor Ideas:

Check out how some beachcombers incorporate their love of seashells, sea glass, beach rocks, and more into their home décor. Articles ›
For quick links to supplies used in our how-to beach crafts, many of the books that Beachcombing has reviewed, and products we recommend, please visit our Amazon storefront.
Quick note: We sometimes provide links on the Beachcombing website to make it easy to find or purchase products, some of which are on Amazon.com. As an Amazon Associate, we may earn from qualifying purchases made when you click and make purchases on Amazon, but the cost does not change for you. Please feel free to purchase items wherever it works best for you and support local independent shops.


