Sea Glass Mosaic Sailboat

Get Carried Back to the Beach on a Sea Glass Mosaic Sailboat
By Jackie Trimper
Have you ever asked yourself, “What am I going to do with all this sea glass?” Well, have I got a solution for you. Here is all you need to know to create a sea glass mosaic sailboat to display some of your sea glass and showcase some of your favorite beach treasures.
I have found that working with sea glass to create art serves a purpose for my sea glass and results in a beautiful way to display it as it hangs in the window with the sunlight shining through. Those little pieces of glass that have been collected along the shoreline can instantly return me to the feeling of calm and peace that being at the beach always brings to me. And so it is that handling and sorting sea glass, working on a sea glass mosaic, or looking at the completed mosaics has tremendous power to transport me back to the beach and bring back that “beach feeling” once again.
As I walk along the beach and look out over the water, seeing the clean crisp edges of a sail can evoke a feeling of adventure and carry me away as I can imagine myself floating upon the top of the water. Whenever I see pictures of sailboats, I get that same feeling of calm that comes with being at the beach and dreaming of being carried over the water to far away places. I am therefore drawn to creating sailboats with my sea glass. It is common for glass to be broken in triangular shapes and so often when I pick up a triangular piece of sea glass on the beach, I imagine it to be the sail of a boat out on the water.
So…take a look in your collection of sea glass and other beach treasures and pick out a few pieces you would like to showcase in a sea glass mosaic art piece.

Supplies
- 8" x 10" picture frame with glass. I prefer to recycle old frames, but you can use a new one if you prefer.
- Small tube of clear silicone. See insert on why I use clear silicone for an adhesive.
- Sea glass: a mixture of green for the water, white for the sky, and brown for the boat.
- Some special pieces of sea glass you want to showcase. Each finished mosaic is a one of a kind piece of art because of the special pieces you decide to use in your mosaic.
- Wooden skewers: small toothpicks or BBQ skewers.
- Paper and pencil for pattern.
- Hanging hardware.
Technique
Step 1:
Prepare your frame by removing the backing and attaching the glass into the frame by inserting the glass and applying a small bead of clear silicone around the edges of the glass on the back. Allow the silicone to set overnight before beginning your art piece.
Step 2:
Sort your sea glass by color and size. Choose some special pieces that you want to showcase to include in the sails. As well, set aside two triangle shapes and two long shapes to make two small sailboats in the background.
Step 3:
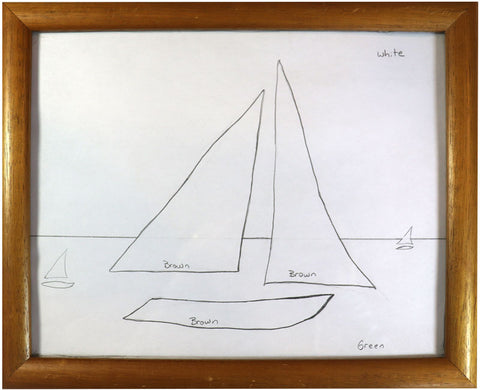
Draw the pattern of a sailboat on a piece of 8" x 10" paper and tape the pattern to the back of the glass in the frame. Be sure that the line you create on the horizon is straight and at a 90-degree angle with the edge of the frame. The horizon line over water is always straight in nature.

Step 4:
Arrange the special pieces you want to showcase in the sail of the sailboat and fill in the remaining area of the two sails and the boat with brown sea glass. To attach the sea glass pieces, apply a small bit of silicone to the back of each piece of sea glass. It will take some time to set so you have time to move pieces around. Add in the two background sailboats where you would like them.

Step 5:
Using the silicone, attach green sea glass for the water. Arrange the sea glass so there are small pieces of green on the horizon line, with the pieces getting larger as you move towards the bottom of the frame. This helps to give the impression of distance in the water.

Step 6:
Attach white sea glass for the sky. I like to include shades of aqua, sea foam, and pale pastels to add interest to the sky. I also arrange some of the pieces in flowing lines so that the sky appears more dynamic.
Step 7:
Give your mosaic a few days for the silicone to fully set. If you used silicone that is white, you will know it is set when it has dried clear. Attach hanging hardware. I prefer to hang my sea glass mosaics in front of a window where the changing light of the day brings it to life and provides an ever-changing look to the mosaic.
Tips:
- I prefer to leave to some space between the individual pieces of sea glass. Your eye will fill in the gaps if the pieces are fairly evenly spaced, creating a good “mosaic effect.”
- Work slowly to ensure you find just the right pieces that work well with each other. It is best to have a large pile of pieces to pick from so you can find pieces that “fit together like a puzzle.”
- Use the wooden skewers and toothpicks to clean off any excess silicone before it dries to make your finished piece look neater.
- Take your time because the longer it takes you to complete your piece of art, the more hours of relaxation you will have while playing with your sea glass.
After completing this small sea glass mosaic sailboat, you will have the skills you need to complete sea glass mosaic designs as large and as complex as your imagination, your sea glass collection, and your time permits. You could try a sailboat as large as this one completed on a 27.5" x 29.5" antique window that came out of a Nova Scotia farmhouse. I call this one Sailboat Regatta. On a piece this big, there is lots of room to add interesting details and showcase even more special sea glass pieces and other beach treasures.
Every time you look at your piece of art it will take you back to the beach and return you to that feeling of peace and calm that you get every time you go to the beach.
To learn more about creating sea glass mosaic art, check out Jackie’s book, Windows to the Past—Creating Sea Glass Mosaic Art. Learn more at jackietrimperseaglass.com.
Make art with your beach finds

Learn how to make art, jewelry, and fun home decorations with seashells, sea glass, beach rocks, and more. Articles ›
This article appeared in the Beachcombing Magazine May/June 2019 issue.
For quick links to supplies used in our how-to beach crafts, many of the books that Beachcombing has reviewed, and products we recommend, please visit our Amazon storefront.
Quick note: We sometimes provide links on the Beachcombing website to make it easy to find or purchase products, some of which are on Amazon.com. As an Amazon Associate, we may earn from qualifying purchases made when you click and make purchases on Amazon, but the cost does not change for you. Please feel free to purchase items wherever it works best for you and support local independent shops.
2 comments
I collected a lot of sea glass pieces recently and was wondering about how to make a see-through glass mosaic art. This technique you shared is fantastic! I love it that it requires only a few supplies, and the tips you share make all the difference. Thank you so much for writing this tutorial!
This is a great article and so good of you to share all your tips and tricks! Your book is awesome and has been so helpful – plus beautiful as it sits on the coffee table. Hats off to artists like you!


